The Attempt at a Cardboard Sculpture
- Brittany Azari
- Oct 21, 2020
- 4 min read
Next up in the 3D design projects is the cardboard planar project. This particular project was incredibly deceiving. After seeing pictures of maquette and the final pieces from other students, I immediately thought to myself, "this looks so easy, anyone could do it!" Boy oh boy was I wrong! This particular project was not the simplest of things but it definitely was a lot more difficult than I had expected. So now let's take a walk down the road of creating what my husband has lovingly called the "cardboard robot."
The Abstract Cardboard Tripod

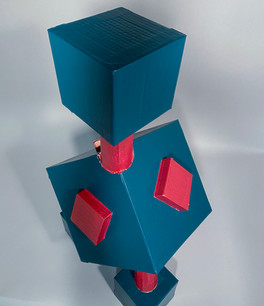
The purpose of this piece was to create an abstract, non-representational sculpture made from cardboard. This was one of three proposals I had created and I chose this one due to the nature of interesting forms and it being an original piece. The inspiration behind it was simply a take on the metal jacks toys. There wasn't any sort of inspiration from an artist or other outside source.
Materials

This project was a lot simpler in the tools that were required and only two of which I had never used before. However, there were actually two different sets of materials required as there were two phases of this project. First, there was the maquette phase in which a smaller scale model of the project was to be constructed. This model was created using posterboard, masking tape, rulers, scissors, and a carpenter square. For the final piece, the tools pictured above were using in creating a freestanding sculpture. The entirety of the piece was constructed of corrugated cardboard that was pieced together using hot glue and tabs. The seams were then covered in the brown water-activated tape to create a seamless edge. After the tape and glue were dry, the piece was primed completely using white Kilz primer. The finished piece was then painted a combination of a teal-y blue and a metallic rust/pink as accents on the main forms.
The Mini-Me of the Project (aka Maquette)
Before actually starting on the full size piece, we had to construct a smaller scale version of our intended piece. This was created out of posterboard and was meant to be approximately 12"-18" in the longest direction, which is basically about half scale of the final piece. Before moving on to the cardboard, this maquette had to be approved in order to have a successful go at the cardboard. This phase of the project was intended to work out any kinks that may arise and to be able to work them out prior to making mistakes with the cardboard. Although this did work out the majority of the issues, there were still some that came up while working with the cardboard.
Final Piece in Progress
This is a time lapse showing me drawing out the twenty-four 6" squares I needed to create the three smaller cubes in my final piece. This is only a small piece of the time lapse as the full length was around two minutes - the whole mapping time was around 45 minutes or so!

This is the starting point of when I was creating the cylindrical tubes jutting out from the large main cube. I took this picture because they looked like little tables and it was at that point I realized that the smell of the glue was getting to my head.

The naked cardboard before it got primed and painted.
The Finished Piece
Final Thoughts
To say that this piece didn't test my patience would be a complete lie. There were a few times that I was very ready to throw in the towel and not even finish because of the frustration I was feeling. I convinced myself to see it through not just for myself but also for my grade! The biggest struggle that I had I creating this piece was trying to get the top most tube placed within the top of the large cube. It had to be attached in a way that the videos didn't really cover how to get it placed and cut right. It turned into a very time-consuming trial and error that eventually paid off. Another struggle that I had was in trying to create the tubes and make them curve the right way. Getting the cardboard to actually curve was relatively simple but getting them to stay curved and not snap open was a little more trying. The ends of the tubes that had to be seamed together kept pulling away and creating gaps which lead to needing more glue and trying to find the best way to keep them together.
This project helped me learn that I still need to work on not putting work and projects off when I'm to fully invested in them and I honestly think that is something that will just have to come with time. Overall, I'm very happy with the outcome of this project and I hope that the time and effort that I put into it will show itself in some of my future projects.


Comments